Swap function
Build the swap functions that connect a trade trigger to the liquidity pool in an automated market maker model. Swap Function So We’ve built the Swap Trigger.
Swap Function
So We’ve built the Swap Trigger, We’ve built the Liquidity pool, next up, we’re going to build the Swap Function.
We will build the swap functions above the liquidity pool, with one to the left and one to the right. You are free to make your own design choices and choose to build it differently, as long as the nodes, connections and math are the same.
Swap A for B —— Swap B for A
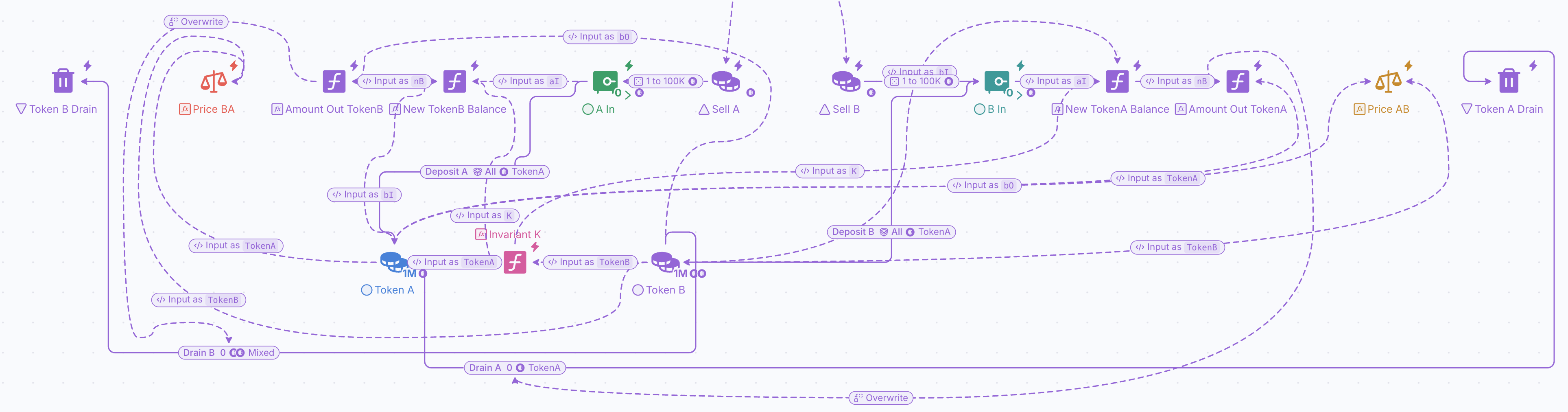
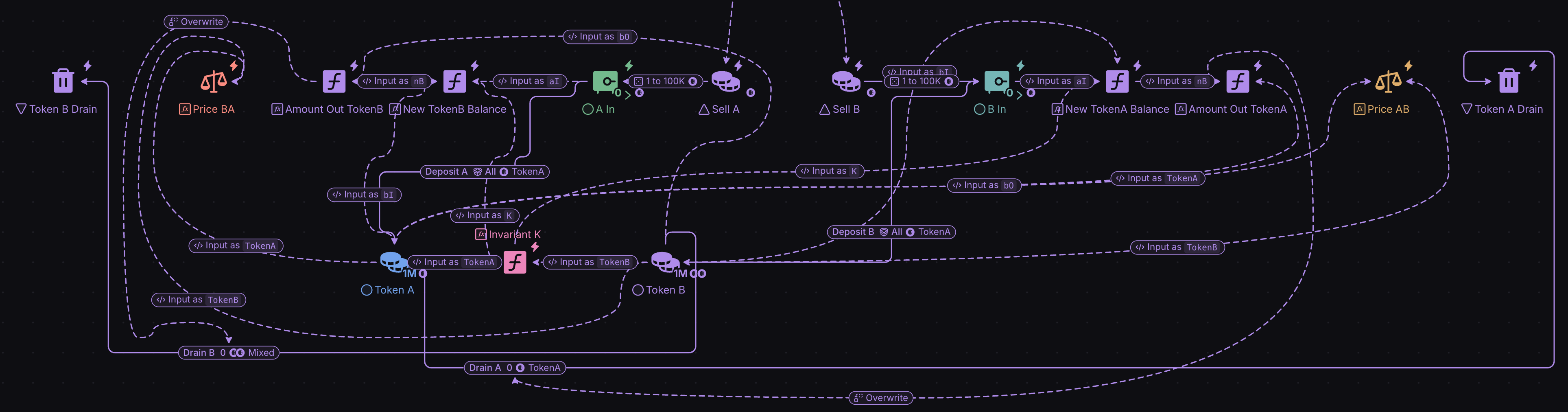
Lets build the Swap Function on the left first (Swap A for B).


This means i am selling Token A into the liquidity pool and receiving Token B in return
Step1:
Put a Source (triangle) on the diagram with the following settings
- Trigger = Passive
- Color (floating toolbar) = Green
NOTE: If you made the source automatic here, we wouldn’t need the swap trigger we first built, but you would also not have the source triggered based on probability and randomness. It would fire automatically, every step, initiating a swap.
Step 2:
Put a pool to the left of the source with the following settings
- Trigger = passive
- Direction = Pull (default)
- Color (floating toolbar) = Green
Step 3:
Connect the Source and the Pool with a resource connection. Settings:
- Type = Dice roll, with 100000 after the D (it reads D100000)
- Color (floating toolbar) = Green
Draw the connection from the Source to the Pool
Step 4:
Put a register to the left of the pool. Settings
- Formula = K/(aI +bI)
- Label: New TokenB Balance
NOTE: We called variables K, aI & bI. K is the data coming from the invariant K. bI is the data coming from the LP pool of the token going IN. aI is the amount of the Token going in to the LP
NOTE on REGISTERS: Here is a great example of using the register for formulas.
The formula here is saying, the new balance of Token B = the invariant K divided by the Amount of Token A going into the LP + the Existing balance of Token A in the LP The variables in the formula, K, aI, bI have not yet been connected to the register, but we will! once we’re done building the nodes
Step 5:
Connect the pool to the register with a STATE connection. Settings:
- Formula = aI
- Label = Amount In Token A
NOTE: We have our first variable going into the register
Step 6:
Place another register to the left of the New Token B Balance Register. Settings:
- Formula = bO-nB
- Label = Amount Out TokenB
- Color (floating toolbar) = Light blue
NOTE:The formula here is saying, the amount of Tokens B leaving the liquidity pool = Balance of token B in the pool, minus the New balance of Token B in the pool
The new balance we just calculated in the previous register, and by using the difference between the two, we can specify the amount of Token B that should be leaving the liquidity pool in return for the amount of Token A that is entering the liquidity pool.
Step 7:
Connect the New TokenB Balance Register and the Amount Out TokenB Register with a STATE connection.
- Formula = nB
Note: You just connected one register to another using a state connection. You are feeding one variable from a register to another register! Pretty cool no?
Step 8:
Put one more register next to the previous one. Settings:
- Formula = TokenB/TokenA
- Label = Price BA
NOTE: what we are saying here is the price of token that is bought B is compared to the token that is sold, Token A
Step 9:
Place a sink (inverted triangle) next to the previous register. Settings: Trigger = Auto
- Label = Token B Sink
- Color (floating toolbar) = Light blue
Great job, you’ve finished the bones of the swap function, and you should have something that looks like this.
Making the next swap function is super easy!
Highlight all of the nodes of your swap function, and copy and paste them!
There are only a few things u have to change.
- Wherever u see an A put a B and wherever u see a B, put an A.
- Drag and drop the nodes so that they line up in this direction
Swap B for A


Now that we’ve made all of the parts, we can connect the swap trigger, swap functions and liquidity pool together.