Framework Basics
At its core, the Machinations framework is based on six types of basic Nodes and two types of Connections.
The 6 Basic Nodes:
- Sources (S) create Resources
- Pools (P) collect Resources
- Sinks (K) consume/destroy Resources
- Converters (V) transmute various types of Resources into another
- Traders (X) exchange Resources
- Gates (G) distributes Resources
The 2 Connection types:
- Resource Connections (C) determine how Resources flow through a diagram.
- State Connections (Alt+C) modify the state of diagram elements.
◉ Resources
All game systems consist of elements in a constant flow of Resources.
Resources can be anything from money and property in Monopoly, ammo, and HP in an FPS, or XP and equipment in an RPG.
Resources and the entities or actions that cause them to be produced, consumed, and exchanged make up the games’ internal economy.
Any Resource flow can be represented in a Machinations diagram.
Entities are represented by Nodes and the way in which Resources are produced, consumed and exchanged is determined by Connections.
Nodes
Below is an example of how Sources, Pools, and Sinks work. Notice the Nodes are linked together by Resource Connections (arrows) with a Formula representing the rule by which the Resources will flow between Nodes. Press Play, then click the Sources and Sinks (the nodes with a pointer) to make Resources move.
- Once you click the Source, it produces 3 Resources which will be transferred to the Pool
- The Sink consumes 3 Resources from the Pool
- The Random Source randomly produces between 1 and 6 Resources each time it’s clicked. The
D6Formula notation stands for “Die 6”. To establish the flow rate for each Step, Machinations simulates the throw of a 6-faces die and the Source produces the resulting number of Resources - The
Drain AllSink consumes all Resources in the Pool
- The Interactive Converter transforms 3 Resources from the origin Pool into 2 other Resources
- The Interactive Converter with multiple inputs – when clicking on it, the Converter transmutes 4 gold and 2 Rubies into 1 Skin
- The Interactive Trader exchanges 2 Coins for 3 Wood and moves these Resources into their respective repository: Coins to Pocket; Wood to Woodshed
Gates are versatile and complex Nodes, with the core purpose of redistributing Resources deterministically or probabilistically through the diagram.
- The Deterministic Gate redistributes 10 Resources from the origin Pool and transfers them to each of the target Pools, according to the Formulas, which in this case represent the weights of the outcomes. Due to the deterministic nature of the gate, the order in which the target pool is selected will be kept the same from step to step.
- The Random Gate redistributes the 10 Resources from the origin Pool and transfers them to each of the target Pools according to the probability of their Formulas. Due to random chances, the number of resources in each target pool will be different between steps.
Connections
All the examples above feature Resource Connections; arrows that determine the direction and frequency of Resource flow through the diagram. More on this:
State Connections, on the other hand, modify the state of an element. Here’s how:
In the example above, the State Connection (dotted line) modifies the Formula on the Resource Connection and alters the flow of Resources according to the number of Resources in the Pool. As such, it adds to the initial Formula parameter (1) the number of Resources stored by the Pool after each Step.
There’s more to State Connections than this, though. They can modify Nodes’ states and act as triggers or activators.
Adding nodes to the canvas
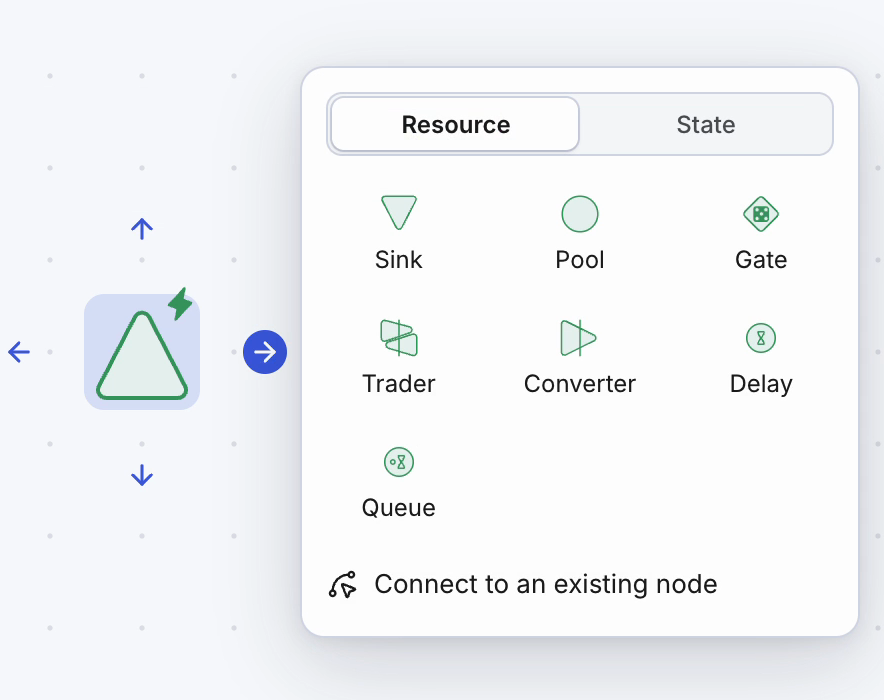
In the list below you can find the main methods for adding components to your workspace:
- Use the components toolbar: Select any component icon and drag it directly on the canvas;
- Create components using the dedicated keyboard shortcuts: The shortcuts are presented at the beginning of this page or in the general shortcuts panel in the application.
- Create components using the mouse shortcuts + toolbar: When any node is selected, double-click on any icon on the components toolbar to automatically create a connection between the selected nodes. You can modify the orientation of the connection by holding the following keys when double-clicking on the toolbar:
- SHIFT – creates a top connection;
- CTRL – creates a down connection
- SHIFT + CTRL – create a left connection
- Moreover, holding ALT with any other shortcut will create a state connection between the two nodes;
- Automatically create and connect components using the diagram-building wizard: After selecting any node, hover the cursor over the directional arrows surrounding the component to display the wizard’s menu. On this panel, you can select any available node and both types of connections. Moreover, if you want to connect two existing nodes using the diagram-building wizard, select the origin node, click on the surrounding arrows, and drag the cursor toward the target node.
The building wizard can be enabled and disabled using the toggle “Show diagram wizard” in View options.